Getting Started
1. Create an account ― Sign-up is free!
To use our powerful and intuitive lab management tools, please sign up on our front page. It is free to create an account on LabUser! After signing up, the next step is to Manage your profile, Join a lab or Create a new lab.
2. Manage your profile
Your profile is the information you entered when you sign up on Labusers.com. To manage your profile, please click on My profile. You can make changes including changing password. Please always remember to click on ![]() after making any changes on any features.
after making any changes on any features.
Forgot your password? To reset your password, please click on "Forgot password?" on the login page and enter your email that you used to create your account. After that, you will receive a password reset email (if you don't receive the email in your Inbox, please check your Junk or Spam email folder) . Click on the link inside the email and you will see a password reset page. After resetting your password, you can login using your newly-set password. If you have a problem resetting your password, please check here  .
.
3. Join a lab.
To join a lab, you will need an invitation from the lab administrator . For example, to join XYZ lab, ask your
lab administrator
to send you the invitation through Members ![]() Invite new members. You will then receive an email titled "Invitation to join XYZ Lab". Clicking on the link in the email will direct you to the login page of LabUser. After logging in (or signing up if you haven't done so), please click on "Confirm" in the Confirm invitation window. You will then see XYZ lab appear on your left menu, and now you are a lab member! The menu you can see on your lab page depends on you lab role. If you join more than one lab, you will see multiple labs appear one the left menu.
Invite new members. You will then receive an email titled "Invitation to join XYZ Lab". Clicking on the link in the email will direct you to the login page of LabUser. After logging in (or signing up if you haven't done so), please click on "Confirm" in the Confirm invitation window. You will then see XYZ lab appear on your left menu, and now you are a lab member! The menu you can see on your lab page depends on you lab role. If you join more than one lab, you will see multiple labs appear one the left menu.
4. Create a new lab
You will be the pricipal investigator of the lab you created. To create a lab, you can click on Create a New Lab at the bottom of the left menu. The default title of the lab will be "your last name + Lab". You can change the lab title when creating a lab. After you enter the required information and click on ![]() . you will see the title of your new lab appears on the left menu, which means you have successfully created a new lab!
. you will see the title of your new lab appears on the left menu, which means you have successfully created a new lab!
5. After joining a lab or creating a new lab
Please first read the section of Regular Lab Memebers for how to use the features of LabUser as a lab member. If you are a lab administrator, you can further visit Principal investigator and Lab Administrator for features accessible only to lab administrators. You can also vist Learn More and FAQ for more details on LabUser system.
Regular Lab Members
Please move your mouse over to see related information or the key  to see what permission is needed to perform the corresponding task.
Compared to Lab administrators, regular lab memebers , by default, have limited access unless otherwise granted by lab administrators.
1. Lab overview
If you are a member of a lab or multiple labs, the frontpage after you log in will be the overview of the labs you belong to. Clicking on ![]() on the left menu will also show you the same thing. Currently it shows you the labs you belong to, your lab role, and the summary of the ordering requests.
on the left menu will also show you the same thing. Currently it shows you the labs you belong to, your lab role, and the summary of the ordering requests.
2. Lab profile and lab members
Lab profile is the basic information of the lab when it was created. Clicking on the lab title (i.e., lab name) shows you the lab profile. To see the list of lab members, please click on ![]() . Click on the
. Click on the ![]() sign to see the alumnus. If a lab member is set as an alumnus (after leaving the lab), you will see him/her in the list of alumnus. However, an alumnus cannot see anything of the lab.
sign to see the alumnus. If a lab member is set as an alumnus (after leaving the lab), you will see him/her in the list of alumnus. However, an alumnus cannot see anything of the lab.
3. Ordering requests
Lab members request ordering lab supplies all the time. LabUsers allow you to submit your ordering requests anywhere you can connect to internet.
To access, add, and update ordering requests, please click on  on the left menu, or click on the
  sign to see all the categories created by the lab administrator.
3.1 Veiw ordering requests
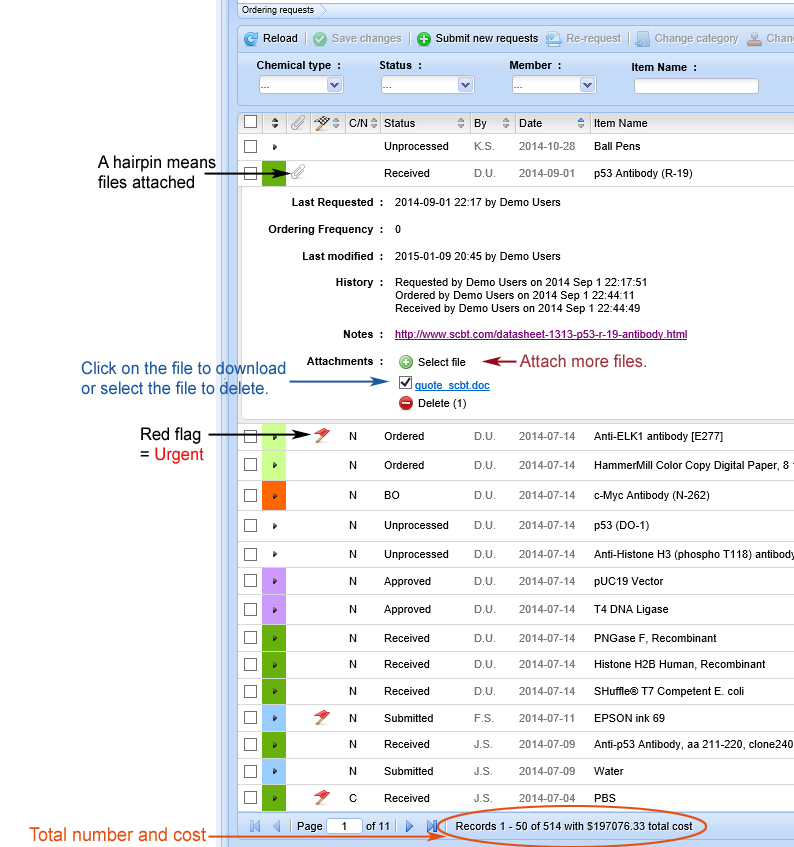
• When clicking on on the left menu, you will see all the ordering requests from a year ago till now. You can find specific requests by applying filters such as Chemical type, Status, Member, Item name, Vendor, Catalog #, date range, PO, and Grant. To select items, click on the checkboxes (on the first column) next to those items.
• To see the details of each item, click on the triangle next to the checkbox to expand it. You can see the Ordering frequency, the full history of the item, and the attached files (if files were uploaded).
• You can see the pattern and trend of ordering in a chart by clicking on ![]() . The chart will cover the ordering requests based on whatever filter options you used and you can also change the filter on the chart page.
. The chart will cover the ordering requests based on whatever filter options you used and you can also change the filter on the chart page.
3.2 Categories
Categories are created by lab administrators to categorize and thus organize ordering requests (categories can also be created for inventory, blanket PO and grants).
If the lab administrator hasn't created any categories, you will only see Uncategorized under ![]() . Any categories created for ordering requests will be shown below
. Any categories created for ordering requests will be shown below ![]() when you click on the
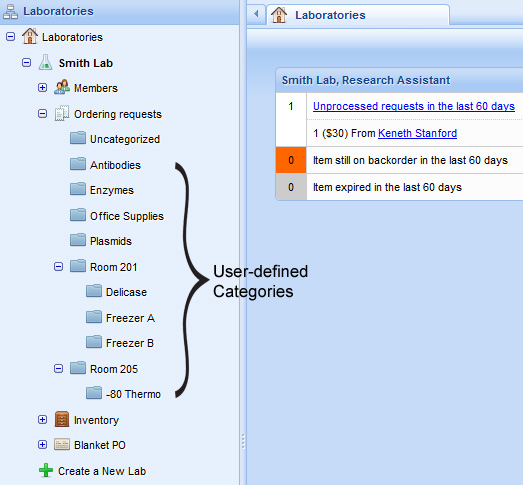
when you click on the ![]() sign. When clicking on any of the user-defined categories, you will see the ordering requests that are assigned to that category. For example, if your lab adminiastrator created a category called Office Supplies, clicking on it shows all the requests that are associated with this category. Please see the example below.
sign. When clicking on any of the user-defined categories, you will see the ordering requests that are assigned to that category. For example, if your lab adminiastrator created a category called Office Supplies, clicking on it shows all the requests that are associated with this category. Please see the example below.
Categories can be hierarchical, i.e., you can have sub-categories underneath a category. The example below shows 3 sub-categories underneath the category "Room 201".
3.3 Submit new requests
To submit new request, please click on ![]() . When submitting a request, the item name is required. If you need to request more than 5 items, please click on Add requests.
. When submitting a request, the item name is required. If you need to request more than 5 items, please click on Add requests.
To re-request existing items, simply select all the requests you would like to re-request and click on ![]() on the top (the number "3" in the bracket means 3 items are selected, which means you can re-request those 3 items).
on the top (the number "3" in the bracket means 3 items are selected, which means you can re-request those 3 items).
3.4 Submit new requests underneath a category
If your lab administrator has created some categories, and you click on one of them under ![]() , you will see all the items that are assigned to that category. If you then click on
, you will see all the items that are assigned to that category. If you then click on ![]() when viewing the items of that category, all your requests will be automatically assigned to that category.
when viewing the items of that category, all your requests will be automatically assigned to that category.
For example, if you enter a category called Office Supplies and click on ![]() , you will see a new tab titled "Submit new ordering requests under Office Supplies category - XYZ Lab" open. When you submit your requests, they will atutomatically be categorized as "Office Supplies". Of course you can always change the category of each request later on before they are ordered. Only lab administrator (or whoever is granted that permission) can change categories after ordering requests become Ordered. Please check whether or not you are underneath a category when submitting requests. If you want to submit requests without assigning a category to it, you can click on Uncategorized (or simply click on
, you will see a new tab titled "Submit new ordering requests under Office Supplies category - XYZ Lab" open. When you submit your requests, they will atutomatically be categorized as "Office Supplies". Of course you can always change the category of each request later on before they are ordered. Only lab administrator (or whoever is granted that permission) can change categories after ordering requests become Ordered. Please check whether or not you are underneath a category when submitting requests. If you want to submit requests without assigning a category to it, you can click on Uncategorized (or simply click on ![]() ) and then click on
) and then click on ![]() .
.
3.5 Permissions for updating requests
If you click on a field(i.e., column) of a request and find that you cannot make any changes, that means you don't have the persmission to edit that field. For regular lab members, the general rule for persmissions is that you can edit a request before its status changed to Ordered. After an request is Ordered, you can still change its status to Back Ordered (BO) or Received, but cannot edit any other fields. After an request is Received, you cannot edit anything of it. If you need to change some field but don't have the permission to do it, please ask your lab adminitrators or whoever is granted the permission to do it. Lab adminitrators can edit requests even after they become Received. Click here to see the difference in permissions between Regular Lab Members and Lab Admnistrators (including PI).
3.6 Update requests
IMPORTANT!!! please make sure you click on ![]() after you finish making any changes.
after you finish making any changes.
• To edit any field of a request, you can directly click on that field to make changes. For example, to change the status of a request, you can directly click on the status of that request and set the new status. If the font color of a field is gray, that field is NOT editable.
• To change the status of multiple requests, please select the requests and click on ![]() on the top. The same tip can be used on
on the top. The same tip can be used on ![]() ,
, ![]() , and
, and ![]() (assigning grant is only available to lab administrators or whoever has that perssmision). The number "3" in the bracket means 3 items are selected for making the change. If you select multiple requests but cannot Change status, Change category, or Delete, that suggests you don't have the permission to edit at least one of the selected requests.
(assigning grant is only available to lab administrators or whoever has that perssmision). The number "3" in the bracket means 3 items are selected for making the change. If you select multiple requests but cannot Change status, Change category, or Delete, that suggests you don't have the permission to edit at least one of the selected requests.
• To attach a file to an ordering request, please click on the triangle next to the checkbox to expand it, then click on Select file to choose the file you want to attach and then press ![]() to upload the file. You can attach multiple files to a request. The size limit of each attached file is 15 MB.
to upload the file. You can attach multiple files to a request. The size limit of each attached file is 15 MB.
• When an update is done successfully, you will see a green dialogue briefly show up at the top the screen.

Click here to see the permissions that lab administrator have for managing ordering requests.
4. Inventory
Inventory items are lab supplies that your lab has already own. Unlike Ordering requests (recording all the orders that are requested, ordered, and receveid), Inventory provides the real inventory management. When the status of an item in the Ordering requests is set to Received, this item will be registered in the Inventory by the system. If the same item was registered in the inventory before, the system will add the quantity of that item to the inventory. If the Expiry Date of an item is recorded on the ordering request and the current date has passed the expiry date, the number in the Expired column of that item will be incremented. You can also re-request selected items in the Inventory, just as you do re-requesting in the Ordering requests.
For inventory management, please see the details on the lab adminisitrator section.
5. Blanket PO
Blanket purchase orders are used for purchasing frequently purchased items or services. Regular lab members can see what blanket PO numbers are available for frequently purchased items and when they will expire. For management of blanket PO, please check the Blanket PO management for the lab administrator.
Pincipal Investigator & Lab Administrators
Please move your mouse over to see related information or the key to see what permission is needed to perform the corresponding task.
Please read the section of Regular Lab Members first since features covered there are for everyone of the lab. Principal Investigator (PI) and Lab administrators by default have permissions to view and manage everything. A lab administrator may have partial administrative permissions if it is configured in such a way. Please visit Roles and permissions of lab members for more details and check whether you have the permissions to perform the tasks of each of the following features decribed below.
1. Configuring your lab (Customization)
What lab members can see and do (in terms of permissions) on Lab profile, Members, Ordering requests, Inventory, Blanket PO, and Grant, etc, all depend on how your lab is configured. Understanding the Roles and permissions and how to configue them is very important for lab management. LabUser allow flexible configuration so that specific combination of permissions can be given to a specifc role. For example, you can create a role called Temporary manager of ordering request, and give this new role the permission to Manage orders after received. All the sections covered below are based on the assumption that whoever can do it is given the permission to do so.
1.1 Member roles
(1) Create new roles
Although Labuser provides default roles with default permissions for regular members and lab administrators, you can create your own roles for your lab. When you click  on , you will see a list of all permissions for all features. Of all the permissions, some of their checkboxes that corsespond to permissions for regular members have already been checked by default. Please check or uncheck the checkbox of each permission based on the role you are about to create and then click on
  .
.
(2) Edit existing roles
LabUser provides default lab roles that lab administrator can use to assign to lab members. All the default lab roles have default permissions. Please read the Roles and permissions for details of permissions associated with default roles.To configure (i.e., edit) the permissions of each role, select the lab role you would like to configure, and then click on Edit. You will see list of permissions underneath each feature. Explanation of each permission is listed here.
(2) Delete existing roles
Select the lab roles you would like to delete, and then click on Delete.
1.2 Category
Labuser provides customizable categories as a powerful way of organizing the information of your lab, which can make the lab management much more straightforward. To customize categories for your lab, expand the category menu and choose the feature where you want to customize your categories. You can then Create, Edit, or Delete categories of your lab.
1.3 Order table configuration
This allows you to add your own user-defined columns (i.e., fields) to the Ordering requests. To add your own columns, Click on Add new column, and choose the column type, then enter the title of the column and specify whether it is required field. If you make a column "Required", that would mean lab members will be required to enter information in that column when they submit their ordering requests. Select user-defined columns to Edit or to delete (  ) it. To rearrange the order of the columns, select a column and use
 ![]() or
or ![]() to move it up or down. After you click on , you will be redirected to the page of Ordering requests to view the result of configuration.
to move it up or down. After you click on , you will be redirected to the page of Ordering requests to view the result of configuration.
1.4. Import Data
If you have data that keep track of your orders or inventory before you use LabUser, you can convert those data to EXCEL format and upload them to your existing ordering requests or inventory on LabUser. Please make sure you arrange the previous data in EXACTLY the same order as the order of items you selected on the upload page.
2. Management of lab profile
Please click on the sign left to Administration on the left tree menu and then click on Lab profile to update it. The lab title by default is "PI's last name + Lab", but it can be changed. If you are the lab member of multiple lab, you will see the lab title of each lab is unique.
3. Member management
Lab admnistrators (who are granted the permissions to do so) can add, edit, and delete members. The only exception is that the role of the pricipal investigator cannot be changed. Click here to see the details of roles and persmissions.
3.1 View lab members
In addition to viewing current lab members and alumni, lab administrators can also see deleted members.
3.2 Invite (add) new members
Please click on Invite new member, then enter his/her email address and choose the lab role for this new lab member. Click Send invitation to send an email invitation to that person.
3.3 Edit or delete existing members
You can directly click on a field to make a change and click on after finishing the editing. To delete members, select those you want to delete and click on Delete. A deleted member will show up in the section of Deleted under Members, and only lab administrators who have the permissions to manage members can view Deleted members. To set members as a alumni when they leave your lab, please select those members and click on Move to alumnus.
3.4 Restore the role of a deleted member or an alumnus
If for some reason you want to restore the role of a deleted member or an alumnus, please click on Deleted or Alumnus, then select the members to be restored to previous & lastest lab role and click on Restore. After restoration, these members will appear on the current member list again and they will be able to do what their roles allow them to do again.
4. Management of ordering requests
Managing ordering requests is basically the same for lab administrators as for regular members, except that lab administrators have permissions to edit orders after they are received, edit payment type (PT), edit PO numbers, and assign/edit grants to orders.
5. Inventory management
LabUser provides easy inventory management tool for managing received items. You can change the Quantity and Consumption amount of each item. When you click on the Quantity in the Inventory, you will see the details of all the same items that are received, you can change the consumed to 1, then it will record 1 there.
6. Management of blanket PO
Lab administrators basically can edit anything of blanket purcahse orders (blanket PO).
7. Grant management
LabUser provides a grant management tool that allows you to monitor the spending of your grant by associating the orders and the grants.
1.1 View grants
In addition to all the grant information created by lab administrators, you can also see the annual and monthly balance calculated by our system. LabUser also show you the ordering requests that are associated with each grant under Associated Requests. You can even click on the number under it to see the details of the orders associated with each grant. If you are a Grantee but not a lab administrator, you can also see the grant that is awarded to you, but cannot view other grants.
1.2 Edit grants
You can directly click on each field of the grant to edit it. If you are a Grantee but not a lab administrator, you can also edit the grants awarded to you, but cannot edit other grants.
1.3 Assign grants to ordering requests
When you are on the page of Ordering requests, You can directly click on the grant field to assign a grant to each ordering requests or to make changes. Another more efficient way of assigning grants is to select multiple ordering requests and then click on ![]() (the number "3" in the bracket means 3 ordering requests are selected for grant assignment).
(the number "3" in the bracket means 3 ordering requests are selected for grant assignment).
Learn More
Please move your mouse over to see related information.
1. Roles and permissions of lab members
There are two types of lab roles: Lab Administrator and Regular Lab Member. Generally, principal investigator, lab manager, and administrative associate are lab administrators, and others are regular lab members. Roles are associated with permissions. In LabUser, you will see pre-set roles with default permissions that can be changed by lab administrators who have the permission to manage member roles. Please keep in mind that permissions have to be given to a lab member through a role.
1.1 Lab Administrators
| Principal Investigator (PI) | PI is the person who created the lab. PI has all the permissions and the role cannot be changed. |
| Lab Manager, Administrative Associate | By default, both Lab Manager and Administrative Associate are lab administrators that has all the permissions except they cannot change anything on the PI. |
| Lab administrators with partial administrative permissions | A lab can set up member roles that have partial administrative permissions. See 1.4 and 1.5 for details |
1.2 Regular Lab Members
By default, a regular lab member has limited permissions. LabUser provides pre-set lab roles of regular lab members with pre-set limited permissions. Regular lab members include: Collaborator, Graduate Student, Instructor, Postdoctoral Fellow, Research Assistant, Research Associate, Rotation Student, Summer Intern, Technician, Undergraduate Student, and Visiting Scholar. The permissions of each of these roles can be configured by the administrator to fit the specific needs of your lab
1.3 Alumnus
When a lab member leaves a lab, the lab administrator can set him/her as an alumnus. He/she will then appear in the Alumnus list under Members. An alumnus CANNOT see anything of the lab.
1.4 Customize member roles and permissions
A lab may want to have administrators that have partial administrative permissions or a lab member who has very limited access. This can be easily configured by creating or editing roles so that they have specific permissions on specific issues. To configue specific permissions for a specific type of role, please click on thesign left to Administration, and then click on Member roles. Select the type of member you would like to configue the permission, then click on Edit. Now you can check or uncheck the checkbox next to each permission under each feature to give or remove specific permissions for the selected lab role. Details of permissions are explained below.
1.5 List of permissions for customization - move your mouse over each task to see what to click to get to it
If a sign appears next to the tip of operation below, that means you may need to click on the sign to expand the menu.
(1) Lab profile
- Update lab profile: Update lab profile.
(2) Members
- View lab members: View current lab members and alumni.
- Invite new members: Add new members to your lab.
- Manage lab members: View deleted lab members and change the role of lab members.
- Manage member roles: Manage the permission of each role. WARNING! Giving this permission to lab members allows a member to give or remove any permission of all lab roles.
(3) Orders
- View orders: View all the ordering requests.
- Manage orders until received: Manage orders until the status of the orders become received. This permission doesn't allow users to edit payment type (PT) or PO #. Permission to edit grant info is independent and controlled by the permission for management under Grants.
- Manage orders after received: Manage orders even after the status of the orders become received. This permission allow users to edit payment type (PT) or PO #. Permission to edit grant info is independent and controlled by the permission for management under Grants.
- Manage categories of order: Create, edit, and delete categories for ordering requests.
- Manage orders table configuration: Create, edit, and delete user-defined columns (i.e., fields) for ordering requests.
(4) Inventory
- View inventory: View the inventory.
- Manage inventory: Create, edit, and delete items in the inventory.
- Manage categories of inventory: Create, edit, and delete categories for the inventory.
(5) Data import
- Import data to orders: Import data from an EXCEL file to the ordering requests
- Import data to inventory: Import data from an EXCEL file to the inventory
(6) Blanket PO
- View blanket PO: View all blanket POs.
- Manage blanket PO: Create, edit, and delete blanket POs .
- Manage categories of blanket PO: Create, edit, and delete categories for blanket POs.
(7) Grants
- View grants: View all grants. A grantee who is not a lab administrator can also view his/her own grants.
- Manage grants: Create, edit, and delete grants as well as editing the grant info in the Ordering requests.
- Manage categories of grant: Create, edit, and delete categories for grants.
2. Status of ordering requests
Ordering requests have different status ranging from Unprocessed all the way to Received. Different status is represented by different colors for easy identification. Please see the color code below. Your lab may not need to use all the status, for example, not all labs use the status of Approved or Submitted. Usually an ordering request starts as Unprocessed. Then it is switched to Ordered after the lab admnistraor order the requested item. If the item is back-ordered, the status will be set as Back-ordered. When the item is received, the status can be set to Received. For some labs, the request may be to be approved and submitted before being ordered. Check here for details on updating status.
| Unprocessed (recorded by system): ordering requests that haven't been processed by lab administrator | |
| Approved: ordering requests that are approved. Not all labs need to use this statis. | |
| Submitted: submitted to the ordering department before it is officialy ordered from the vendor. Not all labs need to use this statis. | |
| Ordered: officialy ordered from the vendor. | |
| Back-ordered: officialy ordered but not available for immediate shipping from the vendor. | |
| Received: orders that are received. |
3. Categories
Features such as ordering requests, inventory, blanket POs, and grants contain a default category called Uncategorized and user-defined categoies (created by lab administrators). Before any category is created, all items belong to the Uncategorized category. To access categories, click on the sign left to each feature can expand the menu tree.
Setting up categories properly can make lab management much easier. Although you can filter ordering requests, inventory, blanket POs, and grants with specific terms, the result from filtering is temporary. The best way to use the Category function is to do the filtering first and then assign user-defined categoies to all or some of the filtered items.
Frequently Asked Questions -- Please contact us at support@labusers.com if you have questions or suggestions
Please click on each question to see the answer and move your mouse over or to see related information.
1. Why couldn't I reset my password?
After you enter your email address (that you used when you signed up on LabUser), you will receive a password-reset email. When clicking on the password-reset link in the email, some users were redirected to our front page instead of the password-reset page. Most likely this is caused by broken link in your password-reset email. In some email client softwares, if a link in an email is too long, it may be broken into more than one lines, which may result in an invalid link. To solve this problem, please copy the whole link to the web address bar to visit the password-reset page .
2. Why couldn't I edit some fields in ordering requests?
If you click on a field (i.e., column) of a request and find that you cannot make any changes, that means you don't have the persmission to edit that field. If you are a regular lab member , by default you can manage ordering requests until it is received. Regular lab members, however, cannot edit the information of Payment type (PT) , PO # , or Grant in the ordering requests.
For regular lab members, the general rule for persmissions is that you can edit a request before its status changed to Ordered. After an request is Ordered, you can still change its status to Back Ordered (BO) or Received, but cannot edit any other fields. After the status of an request becomes Received, you cannot edit anything of it. If you need to change some field but don't have the permission to do it, please ask your lab adminitrators or whoever is granted the permission to do it. Lab adminitrators can edit requests even after they become Received. Click here to see the difference in permissions between Regular Lab Members and Lab Admnistrators (including PI).
3. Why couldn't I see some features but my colleagues can?
This is because you don't have the permissions to view those features. If you need to see them, please ask your lab administrator to give your role those permissions.
4. How do I use categories to improve the management of our orders?
Categories help you organize information in orders, inventory, blanket PO, and grants. Here are a few examples: if you would like to know what items are in -80 °C freezer, make a -80°C category and assign it to related items; if you would like to know how much you spend on office supplies, create an Office Supplies category and assign it to items that are office supplies.
The best way to use the Category function is to do the filtering first and then assign user-defined categoies to all or some of the filtered items. One you organize different items into their own categories, if becomes much easier to understand what you have and how much you have spent in each category.
Administration • To view almuni,
Members
Members, then:
• To edit, directly click on the field you want to edit
• To delete, select the members
• To set members as alumni, select the members
Select the members in the Deleted or Alumnus section
Administration Administration Administration Administration Click on Ordering requests or Click on
next to Ordering requests to access the categories. Ordering requests
Ordering requests Ordering requests Ordering requests Administration Category
• To create, click on Create
• To edit, Select categories
Administration • To add a new column (i.e., field) to ordering requests, click on Add new column
• To edit a user-defined column, click on the column name
Click on Inventory or Click on
next to Inventory to access the categories.
Inventory Administration Category
• To create, click on Create
• To edit, Select categories
Administration Administration Administration Click on Blanket PO or Click on
next to Blanket PO to access the categories. Blanket PO Administration Category
• To create, click on Create
• To edit, Select categories
Click on Grants or Click on
next to Grants to access the categories. Grants Administration Category
• To create, click on Add new grants
• To edit, Select categories
Administration Category. Administration Order table configuration, then: • To add columns, Add new column
• To edit user-defined columns, select a column
• To delete, select a column
• To re-arrange column order, select a column